JS - todolist / 날씨 적용하기(API) 본문
API
어떤 프로그램에서 제공하는 기능을 사용자가 활용할 수 있도록 만들어둔 인터페이스
Geolocaiton API 받아오기

mdn web docs 에 따르면, 위와 같은 정보가 수록되어있음
어떤 코드가 어떻게 동작하는지는 알 수 없지만, 위도와 경도를 가져오는 코드 같음
const accessToGeo = function (position) {
    const positionObj = {
        latitude : position.coords.latitude,
        longitude : position.coords.longitude,
    }
    weatherSearch(positionObj)
}

// latitude 위도 // longitude 경도 geolocation API
const askForLocation = function () {
    navigator.geolocation.getCurrentPosition(accessToGeo, (err)=> {
        console.log(err)
    })
}
askForLocation()
이를 위와 같은 방식으로 실행시켜주면, positionObj라는 객체에 위도와 경도를 저장할 수 있게 됨
askForLocation() -> aceessToGeo
날씨 API 받아오기
openWeather 이라는 사이트를 활용했음
해당 사이트에 가입하면, API key를 받을 수 있게 되고,
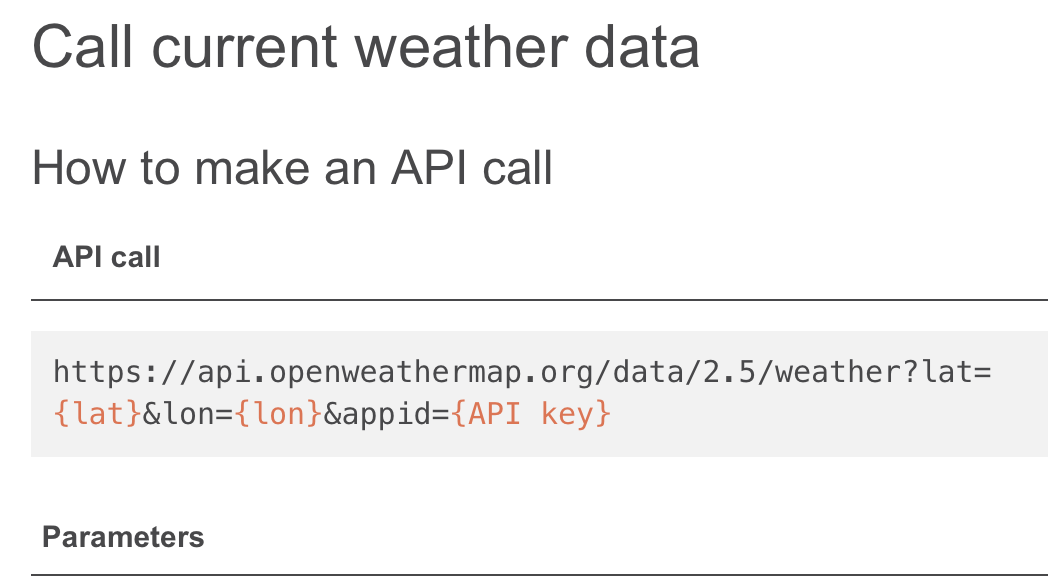
위와 같은 활용방안을 알려줌
const weatherSearch = function (position) {
    console.log(position.latitude)
    console.log(position.longitude)
    const openWeatherRes =
    fetch(`https://api.openweathermap.org/data/2.5/weather?lat=${position.latitude}&lon=${position.longitude}&appid=내 API key`
    )
    console.log(openWeatherRes)
}
이때 fetch 함수는 어떤 http에 접근하기 위한 함수임
쉬운 관리를 위해 적용한 것 같음
어쨌든, 이전에 만들어둔 positionObj 객체를 연결시켜 불러와,
position.latitude, position.longitude 각각의 위도와 경도를 입력시켜줌
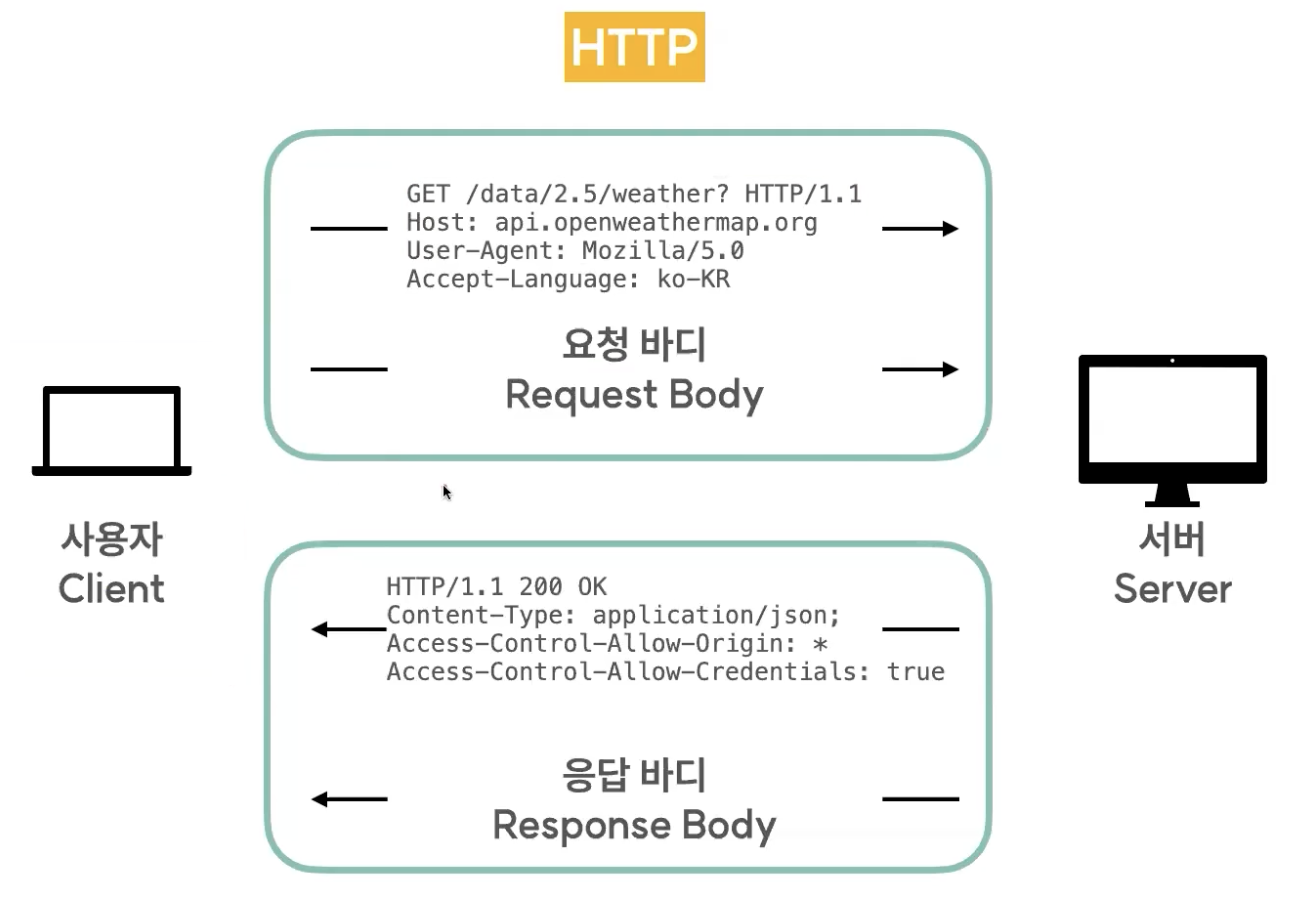
HTTP (hypertext transfer protocol)
서버와 클라이언트가 통신하기 위해 정의된 규약
아래와 같은 방식으로 사용자와 서버 간의 데이터를 송수신하게 됨
HTTP 관련 메서드

동기와 비동기
동기 : 하나의 하나씩 밖에 처리 못함 / 어떤 요청이 주어졌을 때, 그 요청을 해결해야지만 다음 단계로 넘어갈 수 있음
비동기 : 여러 요청을 받고 해결된 요청은 전달
자바스크립트는 동기적으로 동작 / 하지만, 비동기 처리도 가능함
stack 과 queue
stack : last in first out
queue : first in first out
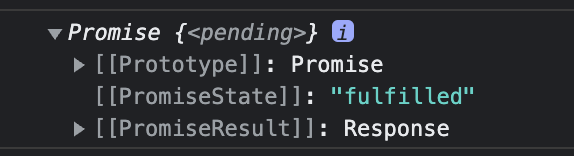
promise 객체
promise의 3가지 상태
- fulfilled : 요청이 성공한 상태
- pending : 요청에 대한 응답을 기다리고 있는 상태
- rejected : 요청이 실패한 상태
이해를 돕기 위한 예시
const promiseTest = function () {
    return new Promise((resolver, reject) => {
        setTimeout(() => {
            resolver('success');
            // reject("err")
        },5000)
    })
}
promiseTest().then((res) => {
    console.log(res)
})
promise는 두 가지 파라미터를 받게 됨
한 가지는 해결했을 때 출력되는 resolver, 거절되었을 때 사용되는 reject
해당 함수는 5초의 시간지연함수가 걸려있는데, 이때
실행시키고자 하는 함수 옆에 then() 을 삽입하면
5초 후에 함수가 실행되고 나서 출력값을 보여줄 수 있게 됨
이를 활용하여, 방금 pending 상태로 받았던 코드에 then() 을 붙여주면 아래와 같은 정보를 콘솔창에서 얻을 수 있음
fetch(`https://api.openweathermap.org/data/2.5/weather?lat=${position.latitude}&lon=${position.longitude}&appid=API key`
    ).then((res)=> {
        console.log(res)
    })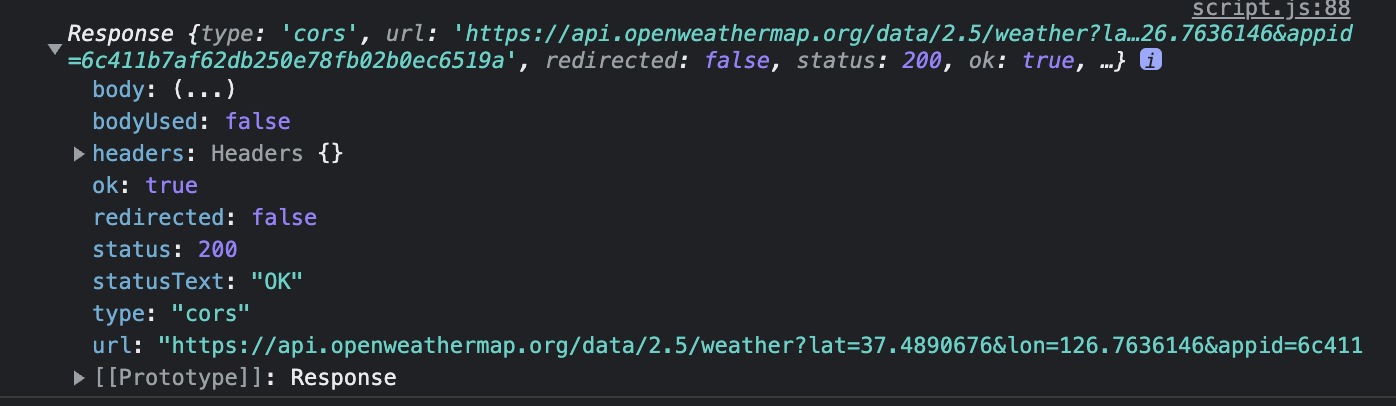
then()을 활용하여 정상적으로 데이터를 가져온 뒤 실행되게 하였으니, 대기중인 pendding 상태가 아님
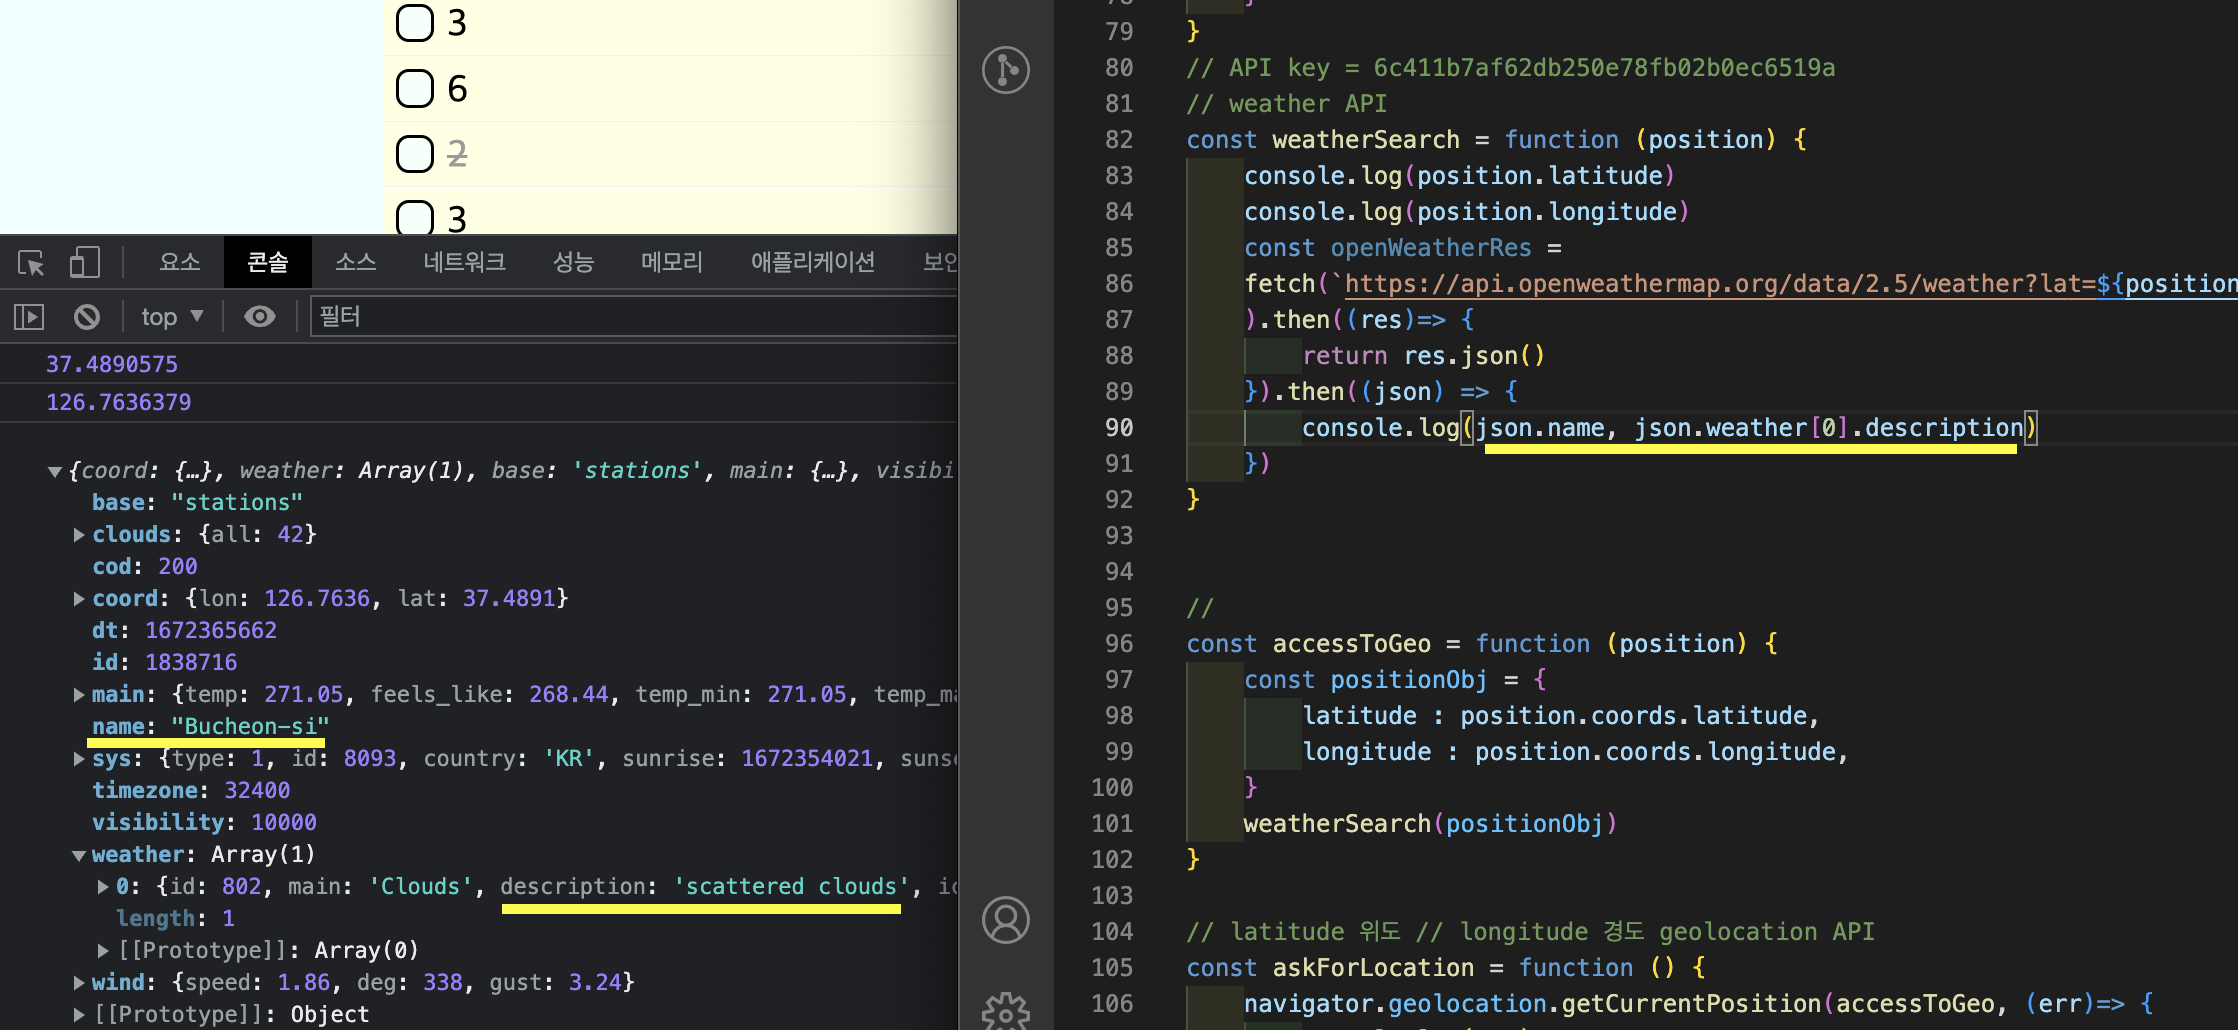
이후 해당값을 가져옴, 이때 담긴 자료는 json 데이터포멧이라는 것을 참고
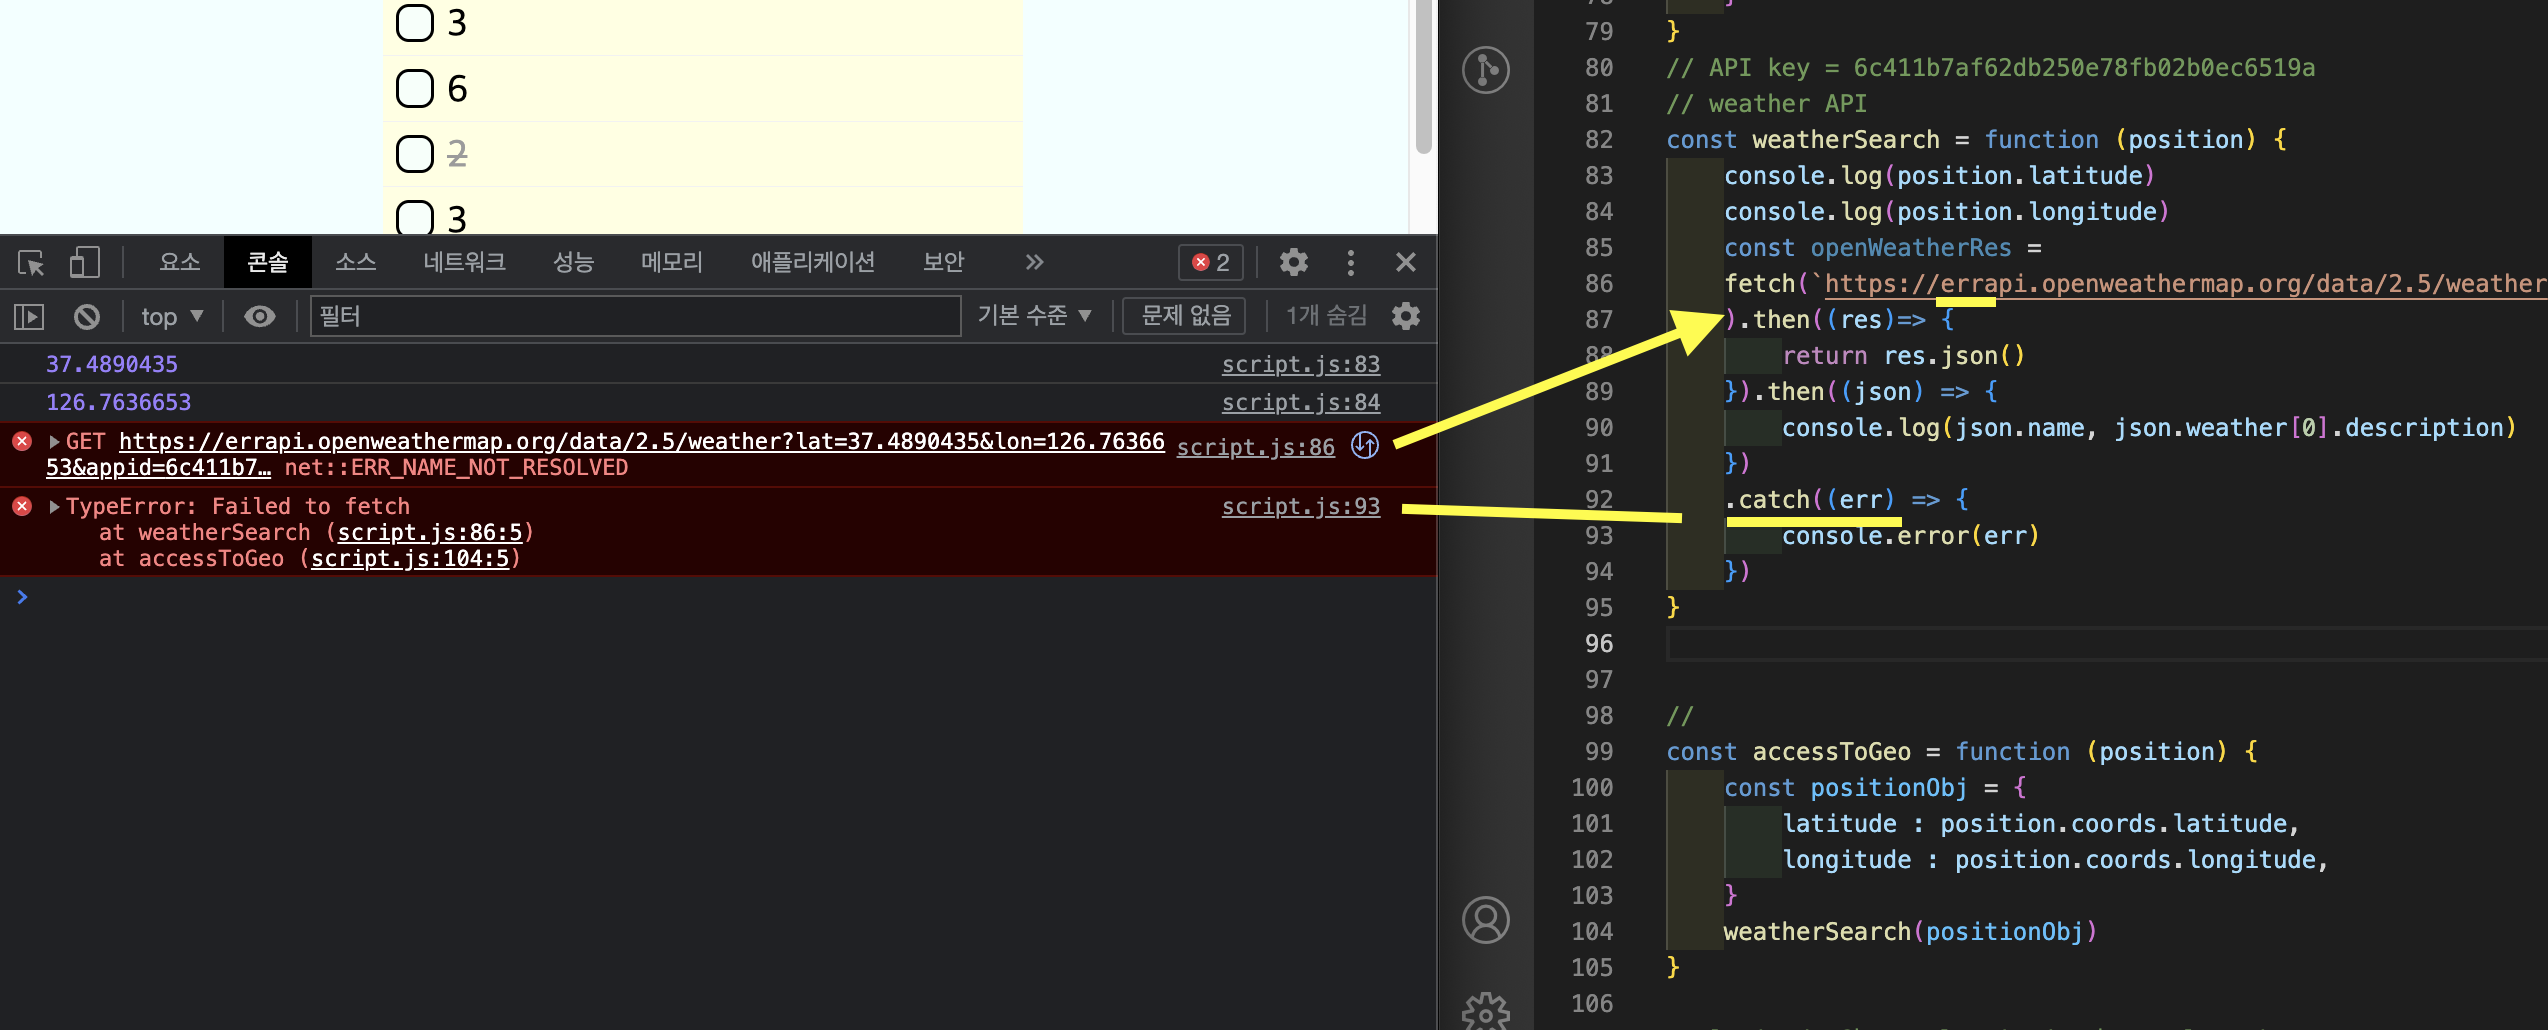
추가로 catch라는 함수도 있음
에러를 잡아주기 위해 사용하는데, fetch 내 http 주소를 일부러 오류값을 내게 수정한 뒤
catch 함수를 사용하면 어떤 오류값이 있는지 알려주게 됨
구조분해할당
구조화되어 있는 배열, 객체와 같은 데이터를 destructuring 시켜, 각각의 변수에 담는 것
예시, 배열
let arr = [1,2]
let [one, two] = arr

console.log(one, two) // 1 2
예시, 객체
let obj = { name:"otter", gender:"male" }
let {name, gender} = obj

console.log(name, gender) // otter male
spread 연산자 (...)
하나로 뭉쳐있는 값들의 집합을 전개해주는 연산자
let arr = [1,2,3,4,5]
console.log(...arr) // 1,2,3,4,5
// 배열을 벗기고 하나씩 출력

let str = "hello"
console.log(...str) // "h","e","l","l","o"
// 하나씩 출력
얕은 복사, 깊은 복사
- 얕은 복사 : 주소값까지만 복사
- 깊은 복사 : 실제 데이터까지 복사
깊은 복사

let origin = {
	name : "otter",
	favoriteFood : {
		first : "sushi",
        second : "hamburger" }
     }

라고 한다면,
const copy = JSON.stringify(origin)
const deepCopy = JSON.parse(copy)
하는 형태로 깊은 복사를 해줄 수 있음

JSON 포멧을 사용하는 방식
Rest Parameter
제외한 값을 가져오기 위해 활용함
let origin = {
	name : "otter",
    age:25,
    petName:"cherry",
    hobby: "playing game"
    }

const {petName, hobby, ...rest(꼭 rest가 아니어도 됨)} = origin

console.log(rest) // {name : "otter", age:25}
날씨 데이터를 가져와 배경화면으로 설정하기
  }).then((json) => {
        const weatherData = {
            location : json.name,
            weather : json.weather[0].main
        }
        weatherDataActive(weatherData)
    })
    .catch((err) => {
        console.error(err)
    })
}
먼저, 받아온 위치(location)와 날씨(weather)를 weatherData에 객체로 저장해두었고
펑션 weatherDataActive() 에 파라미터로 전송함
const weatherDataActive = function ({location, weather}) {
    const weatherMainList = [
        'Clear',
        'Clouds',
        'Drizzle',
        'Fog',
        'Rain',
        'Snow',
        'Thunderstorm',
    ]
    // 가지고 있지 않은 이름이 들어왔을 때, fog로 설정
    weather = weatherMainList.includes(weather) ? weather : "fog"
    const locationNameTag = document.querySelector("#location-name-tag")
    locationNameTag.textContent = location;
    console.log(weather)
    document.body.style.backgroundImage = `url(./images/${weather}.jpg)`
weatherDataActive() 는 이렇게 생겼는데,
이전에 파라미터는 weatherData = {location, weather} 이와 같은 형태를 가지고 있었기 때문에
해당 위치와 날씨만 깔끔하게 전달 받기 위해 {location, weather} 로 설정함
** weatherData로 가져와도 상관은 없으나, 이를 활용하기 밑에서 활용하기 위해서는
weatherData.location / weatherData.weather 이라는 변수로 활용을 해야 하기 때문에 번거로워짐
이후, to-do 가 들어가던 위치에 'location'이 보여지게끔,
배경화면에는 날씨가 보여지게끔 설정하면 끝

'개발 > JavaScript' 카테고리의 다른 글
| JS - sort 메서드 / 로또번호 생성하기 (0) | 2023.01.01 |
|---|---|
| JS - reduce 메서드 / 논리연산자 / 단축평가 (0) | 2022.12.31 |
| JS - todoList (0) | 2022.12.29 |
| JS - 배열 안 객체 활용하기 (1) | 2022.12.29 |
| JS - 반복문(for, while) / 객체활용 for문 / for in / for out (0) | 2022.12.28 |


