
JS - 함수선언 / 시간함수 본문
반응형
베이스 캠프 4일차
함수
function 함수이름(매개변수) {
함수를 호출했을 때 실행할 명령문
}
console.log = 개발자 도구에서 확인 / 데이터 반환 작동 X
return = 결과값 반환
함수 작성 방법
함수 선언식
함수 표현식
화살표 함수
let friend = "김코딩"

// 함수 선언식
function hello(name) {
    alert(name + "님 안녕하세요.")
}
console.log(hello(friend))

// 함수 표현식
const hi = function(name) {
    alert(name + "님 안녕하세요.")
}
console.log(hi(friend))

const greeting = (name) => {
    alert(name + "님 안녕하세요.")
}
console.log(greeting(friend))
인증번호 생성 예제
  <!-- 인증번호 생성 -->
    <script>
        function auth() {
            const token = String(Math.floor(Math.random()*1000000)).padStart(6,"0")
            document.getElementById("target").innerText = token
        }
    </script>
</head>
<body>
    <div>
        <div id="target">000000</div>
        <button onClick="auth()">인증번호 전송</button>
    </div>
</body>
</html>
Colored by Color Scripter
인증번호 생성 예제 - 기존 function을 화살표 함수 형식으로 바꾼 뒤, 랜덤한 색상을 입힘
기존 css에서 색상을 정의한 방식이 #nnnnnn이라는 형식을 채용했던 것을 참고로
style.color 를 활용하여 바꿔줌
단순하게 style(css).color(폰트컬러)를 의미하는 것 같음
기존 css에서 색상을 정의한 방식이 #nnnnnn이라는 형식을 채용했던 것을 참고로
style.color 를 활용하여 바꿔줌
단순하게 style(css).color(폰트컬러)를 의미하는 것 같음
const auth = () => {
    const token = String(Math.floor(Math.random()*1000000)).padStart(6,"0")
    document.getElementById("target").innerText = token
    document.getElementById("target").style.color = "#" + token
}
내장 함수
/ 자주 사용되는 함수를 자바스크립트에 내장하여 편리하게 이용할 수 있도록 한 것
시간 지연 함수 setTimeout(함수, 시간)
시간 반복 함수 setInterval(함수, 시간)
시간 입력 시 ms단위로 입력 (1초 = 1000ms)
// 시간 지연 함수 // 한번
setTimeout(function(){
    console.log("펑")
},3000)

// 시간 반복 함수 // 여러 번
setInterval(function(){
    console.log("퍼퍼펑퍼펑")
},10000)

// 10초까지만 타이머를 진행하게 할 수 있음
let time = 10

setInterval(function(){
    if(time >= 0){
    console.log(time)
    time = time -1
    }
}, 1000)
아까 만든 인증번호 입력 예제에 타이머 추가하고, 타이머가 완료되었을 시에 '인증 완료'버튼을 비활성시키는 방법
const auth = () => {
    const token = String(Math.floor(Math.random()*1000000)).padStart(6,"0")
    document.getElementById("target").innerText = token
    document.getElementById("target").style.color = "#" + token

    let time = 2
    setInterval(() => {
        if(time>=0){
            let min = Math.floor(time/60)
            // 3:0으로 나타나지 않기 위해, '나머지'를 문자열화 한 후, padStart 활용
            let sec = String(time%60).padStart(2,"0")
            // 이때 원하는 위치인 id="timer"에 시간이 입력되게끔 함
            document.getElementById("timer").innerText = min + ":" + sec
            // 시간을 하나씩 빼는 것 잊지 않기
            time=time-1
        } else {
            document.getElementById("complete").disabled = true
        }
        }, 1000);
    }
auth()가 실행되었을 시 타이머를 작동시키면 되는 것이므로, auth()안에 넣어 실행시키게 함
싸이월드 4일차
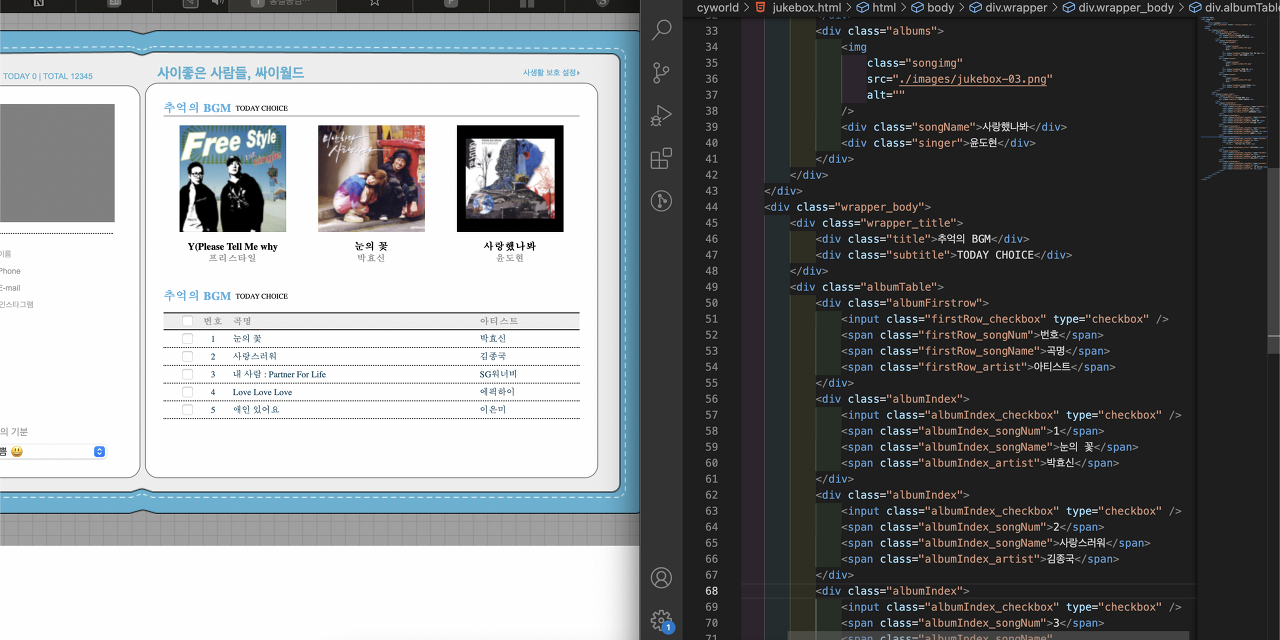
header 부분에서 이미지 삽입과 정렬에 관한 부분은 이미 공부했던 부분이니 생략한다
body 부분의 경우는 표를 만들어야 했는데 쉽지 처음이다보니 않았다
<div class="albumTable">
	<div class="albumFirstrow">
		<input class="firstRow_checkbox" type="checkbox" />
        <span class="firstRow_songNum">번호</span>
        <span class="firstRow_songName">곡명</span>
        <span class="firstRow_artist">아티스트</span>
	</div>
 	<div class="albumIndex">
    	<input class="albumIndex_checkbox" type="checkbox" />
        <span class="albumIndex_songNum">1</span>
        <span class="albumIndex_songName">눈의 꽃</span>
        <span class="albumIndex_artist">박효신</span>
	</div>
먼저 albumTable을 통해 공통된 부분을 정렬하고,
첫줄과 나머지줄의 다른 부분을 따로 제어하기 위해
albumFirstrow와 albumIndex로 구분했다
.albumTable {
    margin: 10px 0px;
}
.albumFirstrow {
    display: flex;
    flex-direction: row;
    width: 100%;
    height: 20px;
    background-color: #eeeeee;
    border-top: 1px solid #000;
    border-bottom: 1px solid #000;
    color: #999999;
    font-size: 10px;
    font-weight: 700;
    align-items: center;
    padding: 4px 0px 4px 20px;
}
.albumIndex {
    display: flex;
    flex-direction: row;
    width: 100%;
    height: 20px;
    border-bottom: 1px dotted #000;
    color: #0F465E;
    font-size: 10px;
    font-weight: 400;
    align-items: center;
    padding: 4px 0px 4px 20px;
}
.firstRow_checkbox, .albumIndex_checkbox {
    width: 3%;
}
.firstRow_songNum, .albumIndex_songNum {
    width: 10%;
    text-align: center;
}
.firstRow_songName, .albumIndex_songName {
    width: 62%;
}
.firstRow_artist, .albumIndex_artist {
    width: 25%;
}
생각보다 많은 시간을 잡아먹었던 것은, 인덱스의 정렬이 space-between이나, space-around처럼 깔끔하지 않아 이 부분을 정리하는 부분이었다
그리고 고민하다, 각각의 요소에 border 1px을 부여하여 위치를 확인한 뒤 가로길이를 조정하여 마무리하였다
반응형
'개발 > JavaScript' 카테고리의 다른 글
| JS - 데이터, 배열, 객체 (2) | 2022.12.26 |
|---|---|
| JS - setInterval / focus() (0) | 2022.12.21 |
| JS - clearInterval (1) | 2022.12.21 |
| JS - 연산자 / for문 / 수학객체 (0) | 2022.12.21 |
| JS - 변수 / 배열 / 객체 / iFrame (0) | 2022.12.21 |
'개발/JavaScript' 관련글
더보기


Comments