node.js - jwtAuth 미들웨어 구현 본문
일주일 만에 포스팅이다. 사실 그동안 아무것도 하지 않은 것이 아니라, 삽질을 좀 했다.
nest.js에서는 뚝딱 뚝딱 쉽게 구현되는 것들이 node.js에서는 왜 이리 예민하게 반응하는지... ㅠㅠ
아무튼 오늘은 로그아웃 구현을 위해 작성한 미들웨어에 대해 얘기해본다.
예전 부트캠프에서는 Nest.js에서 전략 패턴을 사용해서 토큰 검증을 해본 경험이 있다보니,
이번에는 오로지 별다른 기술 없이 알고리즘 로직만을 활용하여 미들웨어를 구현해보았다.
2023.02.22 - [코딩/nest.js] - NestJs - 로그아웃 프로세스 구현 / docker를 사용한 redis
해당 로직은 세 가지 로직으로 구분할 수 있다.
- jwtAuth : 로직의 전체 틀이자 미들웨어 자체로 사용하는 함수
- jwtValidate : request에서 전달받은 accessToken & refreshToken 을 검증 및 반환하는 함수
- logoutValidate : 로그아웃이 되어 있는지 검증하기 위해 redis에 토큰 저장 여부를 확인하는 함수
// jwtAuth.ts

export async function jwtAuth(
  req: any,
  res: Response,
  next: NextFunction
): Promise<void> {
  try {
  // accessToken이 담긴 authorzation & refreshToken이 담긴 cookie 분리
    const headers = req.headers;
    const authorization = headers["authorization"];
    const cookie = headers["cookie"];

	// 1차적 검증
    if (authorization === undefined || cookie === undefined) {
      throw { status: 401, message: "토큰값 없음" };
    }

    // jwtValidate로 accessToken 값이 정상적인 값인지 검증
    const { accessVerify, accessToken } = await jwtValidate(
      authorization,
      next
    );
	// jwtValidate로 refreshToken 값이 정상적인 값인지 검증
    const refreshToken = await jwtValidate(cookie, next);

    // 로그아웃된 토큰인지 검증
    await logoutValidate(accessToken, next);
    await logoutValidate(refreshToken, next);

	// 받아온 accessVerify 내에 저장된 id 값으로 DB에 저장된 유효 유저 id인지 확인
    const user = await userRepository.findOne({
      where: { id: accessVerify["id"] },
    });

    if (!user) next({ status: 404, message: "유저를 찾을 수 없음" });

	// req.user 내에 user를 담아, token값으로도 유저가 누군지 알 수 있도록 전달
    req.user = user;

    next();
  } catch (error) {
    next(error);
  }
}
// 리턴과 검증 방법이 다른 두 토큰을 하나의 함수로 처리할 수 있도록 구성하였다.
async function jwtValidate(jwtToken: string, next: NextFunction): Promise<any> {
  try {
    let token: string
    let type: string

    if (jwtToken.includes("Bearer") || jwtToken.includes("bearer")) {
      token = jwtToken.split(" ")[1];
      type = "access";
    } else if (jwtToken.includes("refresh")) {
      token = jwtToken.split("=")[1];
      type = "refresh";
    }

    if (!token) throw { status: 401, message: "유효하지 않은 토큰" };

    if (type === "access") {
    // jwt에서 지원하는 verify메서드를 통해, 해당 토큰이 유효한지 검증 및 저장된 데이터를 받아온다.
      const accessVerify = jwt.verify(token, process.env.JWT_ACCESS);
      const accessToken = token;
      if (accessVerify) return { accessVerify, accessToken };
    } else if (type === "refresh") {
      const refreshVerify = jwt.verify(token, process.env.JWT_REFRESH);
      if (refreshVerify) return token;
    } else {
      throw { status: 401, message: "유효하지 않은 토큰" };
    }
  } catch (error) {
    next(error);
  }
}
async function logoutValidate(
  token: string,
  next: NextFunction
): Promise<void> {
  try {
  // redisClient.get은 비동기적으로 동작하기 때문에, Promise를 활용하여 처리해주었다.
  // redis-manager를 활용하여 get메서드 구현 시 내부적으로 비동기적 동작을 수행하여 코드가 간결해지는 효과가 있다.
  // 물론 이를 활용하려 노력해보았는데, 아직 완성하지 못했다. 추가적인 삽질이 필요하다.
    const redisToken = await new Promise((resolve, reject) => {
      redisClient.get(token, (error, data) => {
        if (error) reject(error);
        resolve(data);
      });
    });

    if (token === redisToken) throw { status: 401, message: "로그아웃된 토큰" };
  } catch (error) {
    next(error);
  }
}
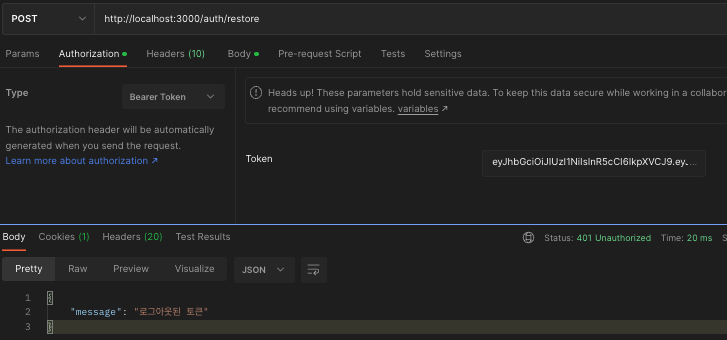
포스트맨을 활용하여 테스트해본 결과
'개발 > node.js' 카테고리의 다른 글
| PostgreSQL 사용기 (feat, docker) (0) | 2023.07.21 |
|---|---|
| Nginx 사용기 (0) | 2023.07.05 |
| Node.js - PM2 (0) | 2023.04.20 |
| Node.js, 미들웨어 & 라우터 핸들러 (0) | 2023.04.13 |
| node.js & graphQL (0) | 2023.04.11 |
'개발/node.js' 관련글
더보기


Comments